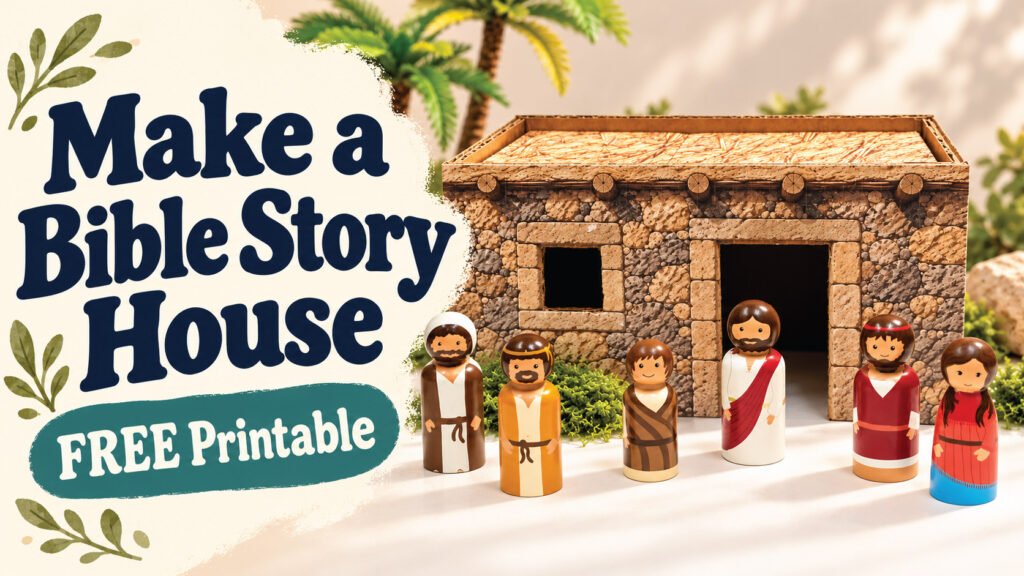
Create your own printable Bible times house for Bible storytelling and small-world play.
We designed this free printable house for our Build a Bible Story: Jesus Heals the Paralytic activity, based on Mark 2:1–12. The story takes place in Capernaum, where many buildings were constructed from local black basalt stone.
The removable roof makes it perfect for recreating the moment when four friends lowered the paralysed man through the roof to reach Jesus.
Print it, build it and add your Storytelling Peg People to bring the story to life.
Download the Free Printable Bible Times House
The template is designed to be printed onto paper or cardstock and then glued to cardboard.
For the best finish, we recommend using cardstock, but regular printer paper will also work.
What You’ll Need
- Printed Bible times house template
- Cardboard (re-use a cardboard box)
- Scissors or a craft knife
- Glue stick or craft glue
- Hot glue gun and glue sticks
- Ruler
Tip: Printing the templates onto cardstock before attaching them to cardboard gives the finished house a smoother, more durable finish.
Step 1 – Prepare the House Pieces
- Print all the templates, including the front wall, two side walls, rear wall, roof and internal roof supports.
- The template is designed for A4 paper. For best results, print at 100% scale.
- Glue each printed template onto cardboard.
- Allow the glue to dry completely.
- Carefully cut out each piece along its outer edges.
Step 2 – Assemble the Walls
- Lay the front wall face down on your work surface.
- Apply a bead of hot glue along the exposed cardboard edge of one side wall.
- Attach the side wall to the back of the front wall, making sure the edges are aligned and the walls form a right angle.
- Repeat with the second side wall.
- Attach the rear wall to the two side walls using the same method.
Tip: Hold each joint firmly for a few seconds while the hot glue sets. Keeping the walls square will help the roof fit correctly.
Step 3 – Choose Your Roof Style
You can make your Bible times house with either a removable roof or a fixed roof.
Option A – Removable Roof
We recommend this option for storytelling and play.
A removable roof allows children to look inside the house, arrange their Storytelling Peg People and recreate Bible stories.
For the story of Jesus healing the paralysed man, the roof can also be made in two sections so part of it can be removed as the man’s friends lower him down to Jesus.
- Carefully cut along the dotted line marked on the roof template if you would like your roof to open in two sections.
- Set the roof pieces aside while you install the internal roof supports.
Option B – Fixed Roof
If you would prefer a permanent roof, simply attach the roof to the top of the assembled house using hot glue.
A fixed roof is quicker to assemble, but a removable roof gives children easier access to the inside of the house during storytelling and imaginative play.
Step 4 – Install the Roof Supports
Skip this step if you are making a fixed roof.
- Take the internal roof support pieces.
- Measure 10 mm down from the top edge of the assembled house walls.
- Attach the supports to the inside of the walls using hot glue.
- Make sure the supports are level so the roof will sit evenly.
The supports create a ledge for the removable roof to rest on and help it sit neatly inside the walls.
Step 5 – Fit the Roof
- Place the roof onto the internal supports.
- Check that it sits flat and fits comfortably inside the walls.
- Cardboard thickness can vary, so you may need to trim a small amount from the edges of the roof to achieve a good fit.
- If you have made a two-piece roof, check that both sections can be lifted out easily.
Tip: The roof should fit securely enough to stay in place during play, but loosely enough for children to remove without damaging the house.
Step 6 – Ready to Play!
Your printable Bible times house is ready for storytelling.
Add your Storytelling Peg People and try recreating Jesus healing the paralysed man in Mark 2:1–12.
Place Jesus and the crowd inside the house. Bring the paralysed man and his four friends to the house, then remove part of the roof to show how his friends lowered him down to Jesus.
Once you have told the story, leave the house and characters available and let children retell the story in their own words.
Safety Note: Hot glue guns and craft knives should only be used by adults. Allow all glued joints to cool completely before children play with the finished house.
Watch How to Make the Bible Times House
Want to see how it all goes together?
Watch our step-by-step video showing how to print, cut and assemble the house.
Use It to Build the Bible Story
We created this house for Jesus healing the paralysed man, but you can reuse it for many other Bible stories that take place in or around a home.
Add Storytelling Peg People and a few simple props, then use the house again and again for Bible storytelling and play.
[LINK TO: Build a Bible Story – Jesus Heals the Paralytic]
Download Your Free Printable House
Ready to make your own?
Download the template, build your Bible times house and keep it ready for your next Bible storytelling activity.